Pytorch
Pytorch is a popular tensor library for deep learning jobs.
Licence
Pytorch is BSD-style licenced: https://github.com/pytorch/pytorch/blob/main/LICENSE
Preinstalled Pytorch environments
JupyterHub, GPU AI Lab or Pytorch environment: https://jupyter.hpc.kifu.hu/ (not suitable for multinode jobs).
Preinstalled Pytorch containers are available through ssh. For example: /opt/software/packages/containers/ubuntu_CUDA_ai_2p0.sif
- Pytorch is also available as a module: module load pytorch/x.x.x or module load AI_env . If you find that some packages are missing, you can often install it yourself with pip install –user.
Currently installed Pytorch verions: 2.2.2; 2.4.1
We are strongly advise against installing a new Conda environment directly into your home folder, as this method consumes a lot of Inode. You can see the Inode information with: df -i, or squota . If you need a custom environment, please use Singularity container technology.
Usage of Pytorch container
Running interactive jobs in container:
Note
To build your own AI container, please refer to: https://docs.hpc.kifu.hu/en/software/singularity.html#singularity . Recipes (or .def files) are also available through ssh at: /opt/software/packages/containers/ .
Create a run_script.sh file with the following content:
module load singularity                                        #load Singularity module
singularity exec --nv ubuntu_CUDA_ai.sif python env_test.py    #run the script in the container
Then run the run_script.sh with the following command:
srun --partition=gpu --cpus-per-gpu=32 --mem-per-cpu=2000 --gres=gpu:1 bash run_script.sh
Hint
Although GPU-heavy jobs usually don’t rely on system memory, it is necessary to reserve enough memory for the container. However, only 2000 MB memory can be allocated for each CPU core. This limit can only be bypassed with reserving more CPU cores.
Running a batch job in container:
The previous interactive job can also be run as a batch job. In this case, the content of the batch_script.sh will be the following:
#!/bin/bash
#SBATCH -A ACCOUNT
#SBATCH --partition=gpu
#SBATCH --job-name=jobname
#SBATCH --cpus-per-gpu=32
#SBATCH --mem-per-cpu=2000
#SBATCH --gres=gpu:1
module load singularity
singularity exec --nv ubuntu_CUDA_ai.sif python env_test.py
This script can be queued with the following command:
sbatch batch_script.sh
Usage of Pytorch module
Pytorch is installed in a Miniconda image file. This environment already contains the necessary driver installations, hence loading CUDA is unnecessary and could possibly be disruptive. The installed Pytorch and Tensorflow modules mutually exclude each other. This means, if Pytorch is already loaded, loading Tensorflow or another version of Pytorch will unload the currently loaded Pytorch module.
Check the available Pytorch versions:
module avail pytorch
Using the default version of the pytorch module in an interactive job:
srun -p gpu -c 16 --gres=gpu:1 --pty bash
module load pytorch
python your_pytorch_script.py
Parallel jobs with Pytorch (torchrun):
Note
The following examples are tested only for the Pytorch modules.
Distributed Data Parallel (DDP)
A simplified DDP flowchart for a 1 node job:
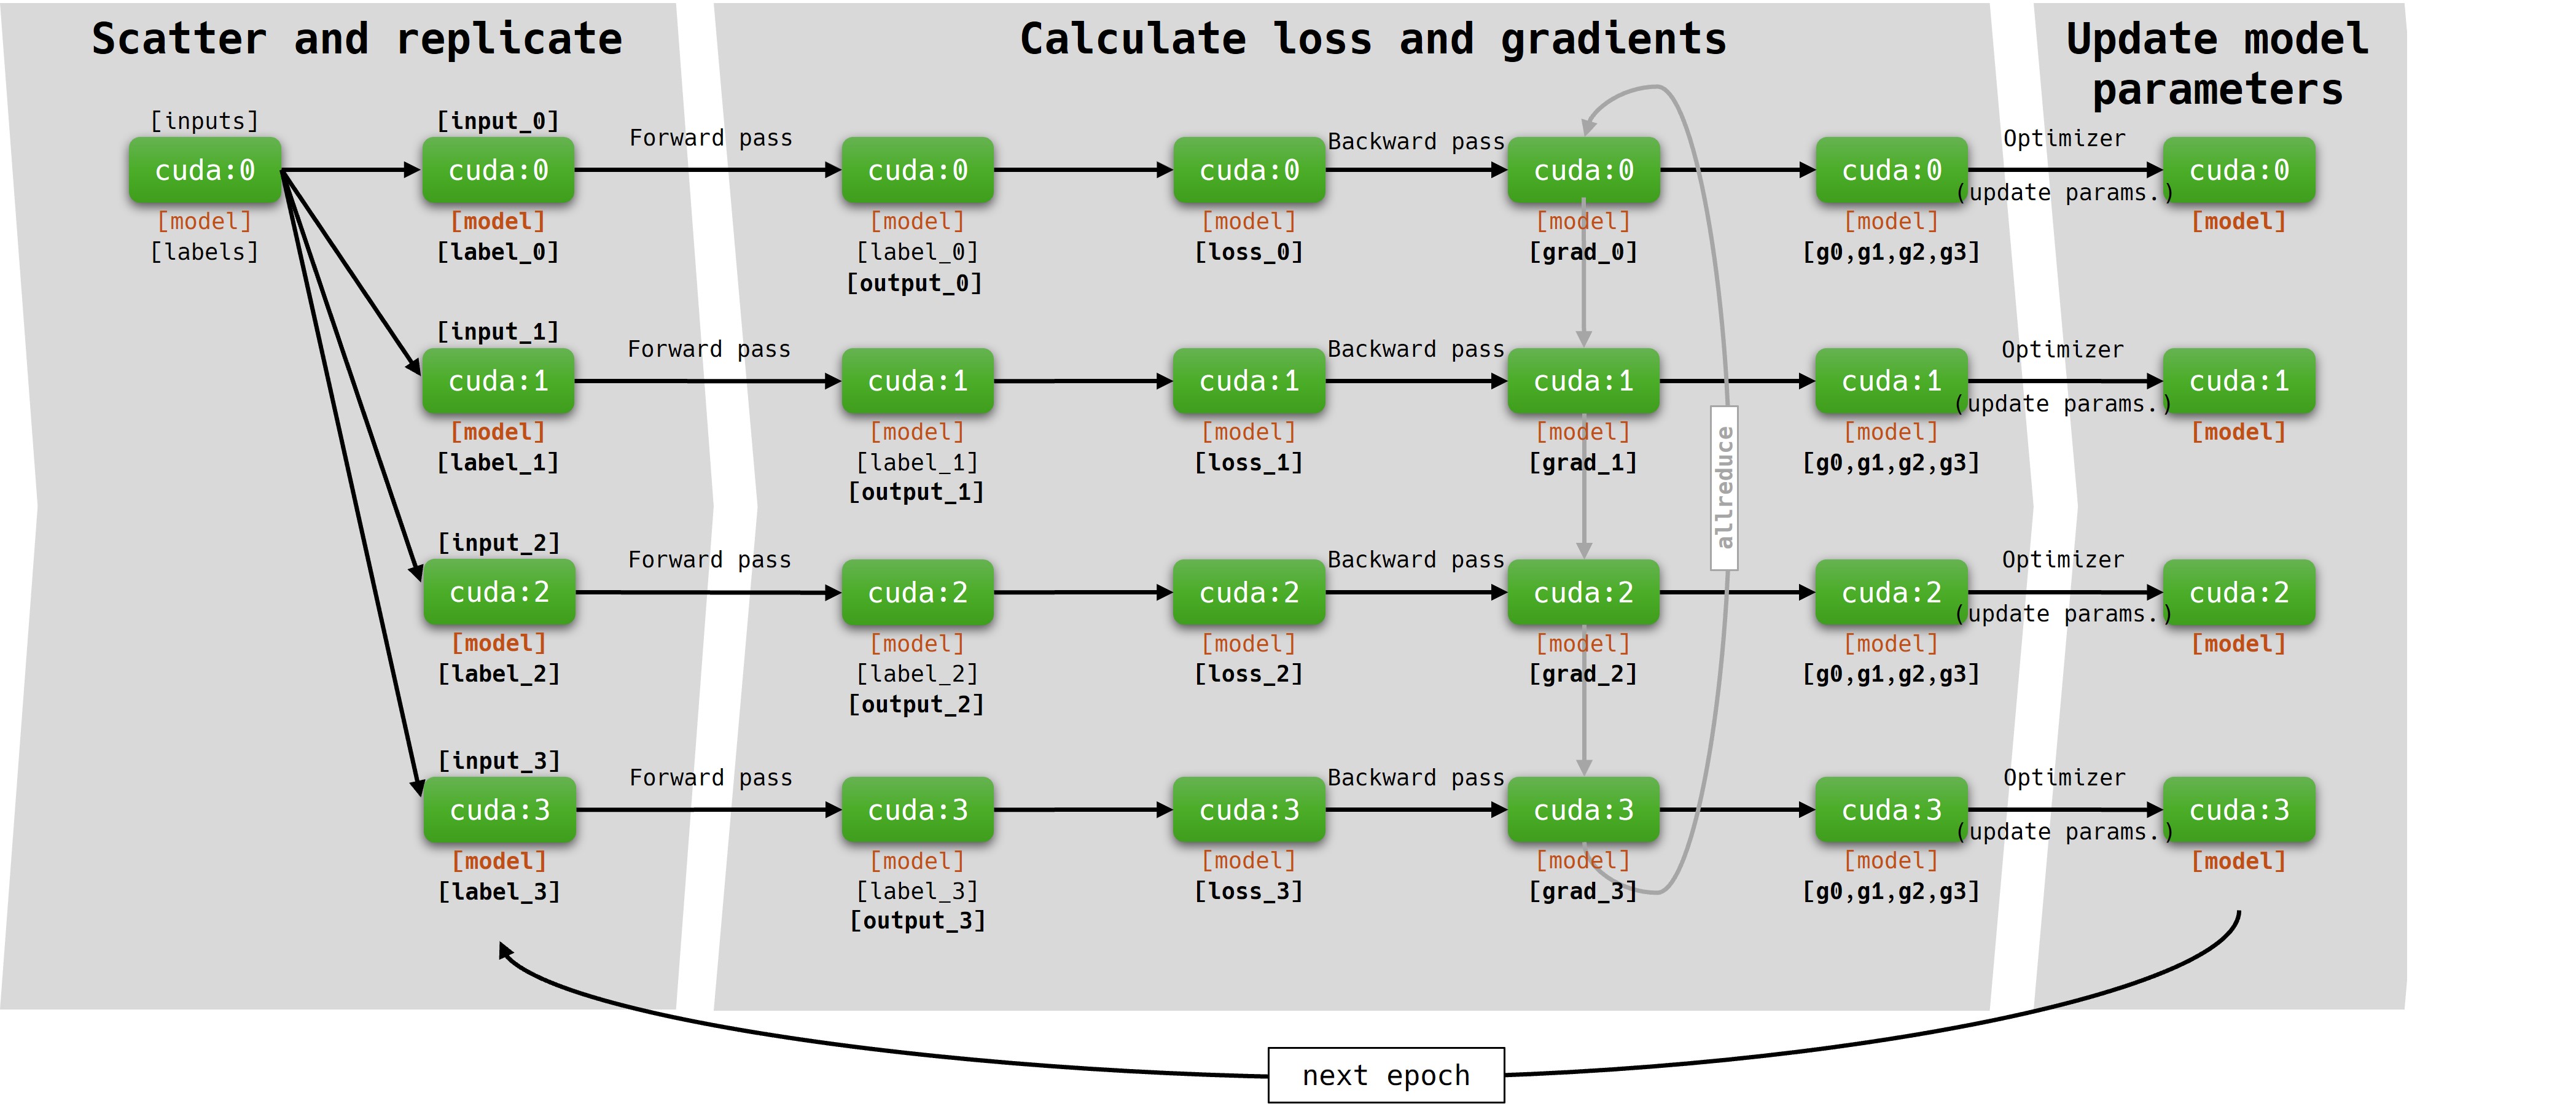
DDP is a popular solution for processing a large dataset with a small model in a distributed environment. During the first epoch, exact copies of the model are distributed among the available GPUs. Each copy of the model processes a subset of the input data. Data sharding and distributing data subsets among the workers is automatically handled by the DistributedSampler. Communication between the workers (GPUs and nodes) is handled by nccl and torchrun’s c10d backend. At the end of each epoch, the gradients are aggregated, and model parameters are updated synchronously. Training a model with DDP can greatly reduce model training time.
DDP method can be applied in a multi-node setup as well:
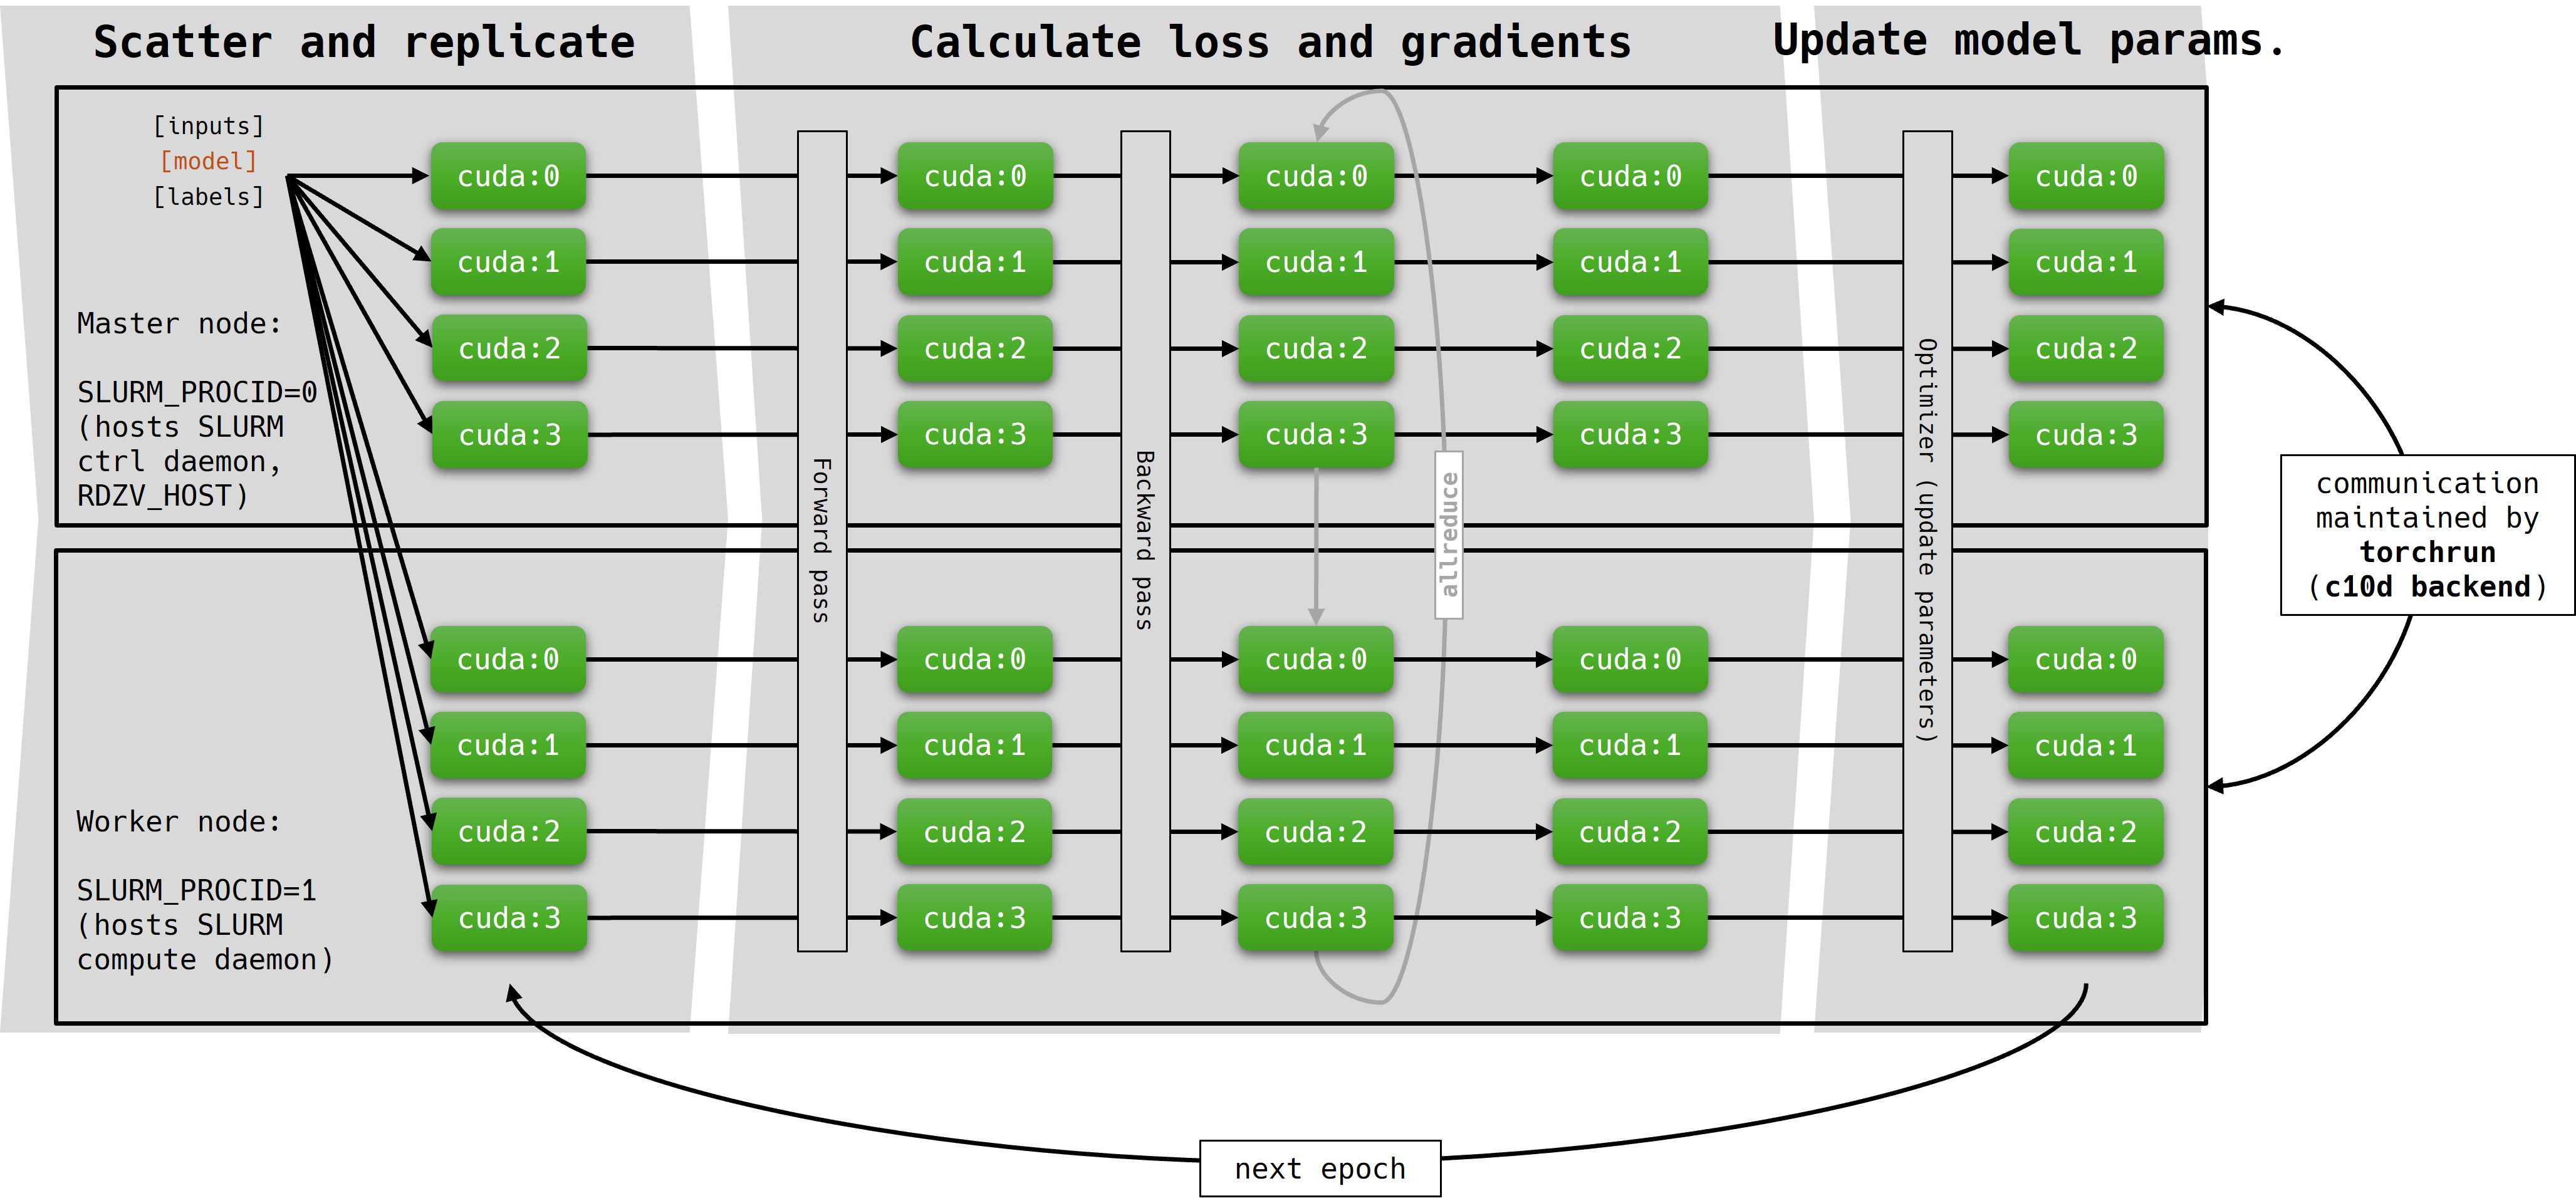
Multi-node setup: Changing the python script is not required. To set up a multi-node DDP job, the only change in the jobscript is in the requested nodes.
Jobscript for a DDP job:
#!/bin/bash
#SBATCH --account=<account>
#SBATCH --partition=gpu
#SBATCH --nodes=1                               # MULTI-NODE CHANGE FOR 2 NODES: --nodes=2
#SBATCH --ntasks-per-node=1
#SBATCH --cpus-per-task=64
#SBATCH --time=0-00:15:00
#SBATCH --gres=gpu:4
#SBATCH --output=output.out
#SBATCH --exclusive                             # To avoid communication errors!

export RDZV_HOST=$(hostname)                    # The name of the master node (automatically set)
export RDZV_PORT=29400

srun torchrun \                                 # Torchrun will control the communication between GPUs and nodes.
    --nnodes=$SLURM_JOB_NUM_NODES \
    --nproc_per_node=4 \                        # Equals the number of the reserved GPUs in one node.
    --rdzv_id=$SLURM_JOB_ID \                   # Unique identifier for the processes, safe to use the JobID.
    --rdzv_backend=c10d \
    --rdzv_endpoint="$RDZV_HOST:$RDZV_PORT" \
    your_DDP_job.py
A complete example of a DDP job: https://git.einfra.hu/hpc-public/AI_examples.git
runscript: run_DDP_n2_g4.sh
pytorch script: DDP.py
Model parallelism
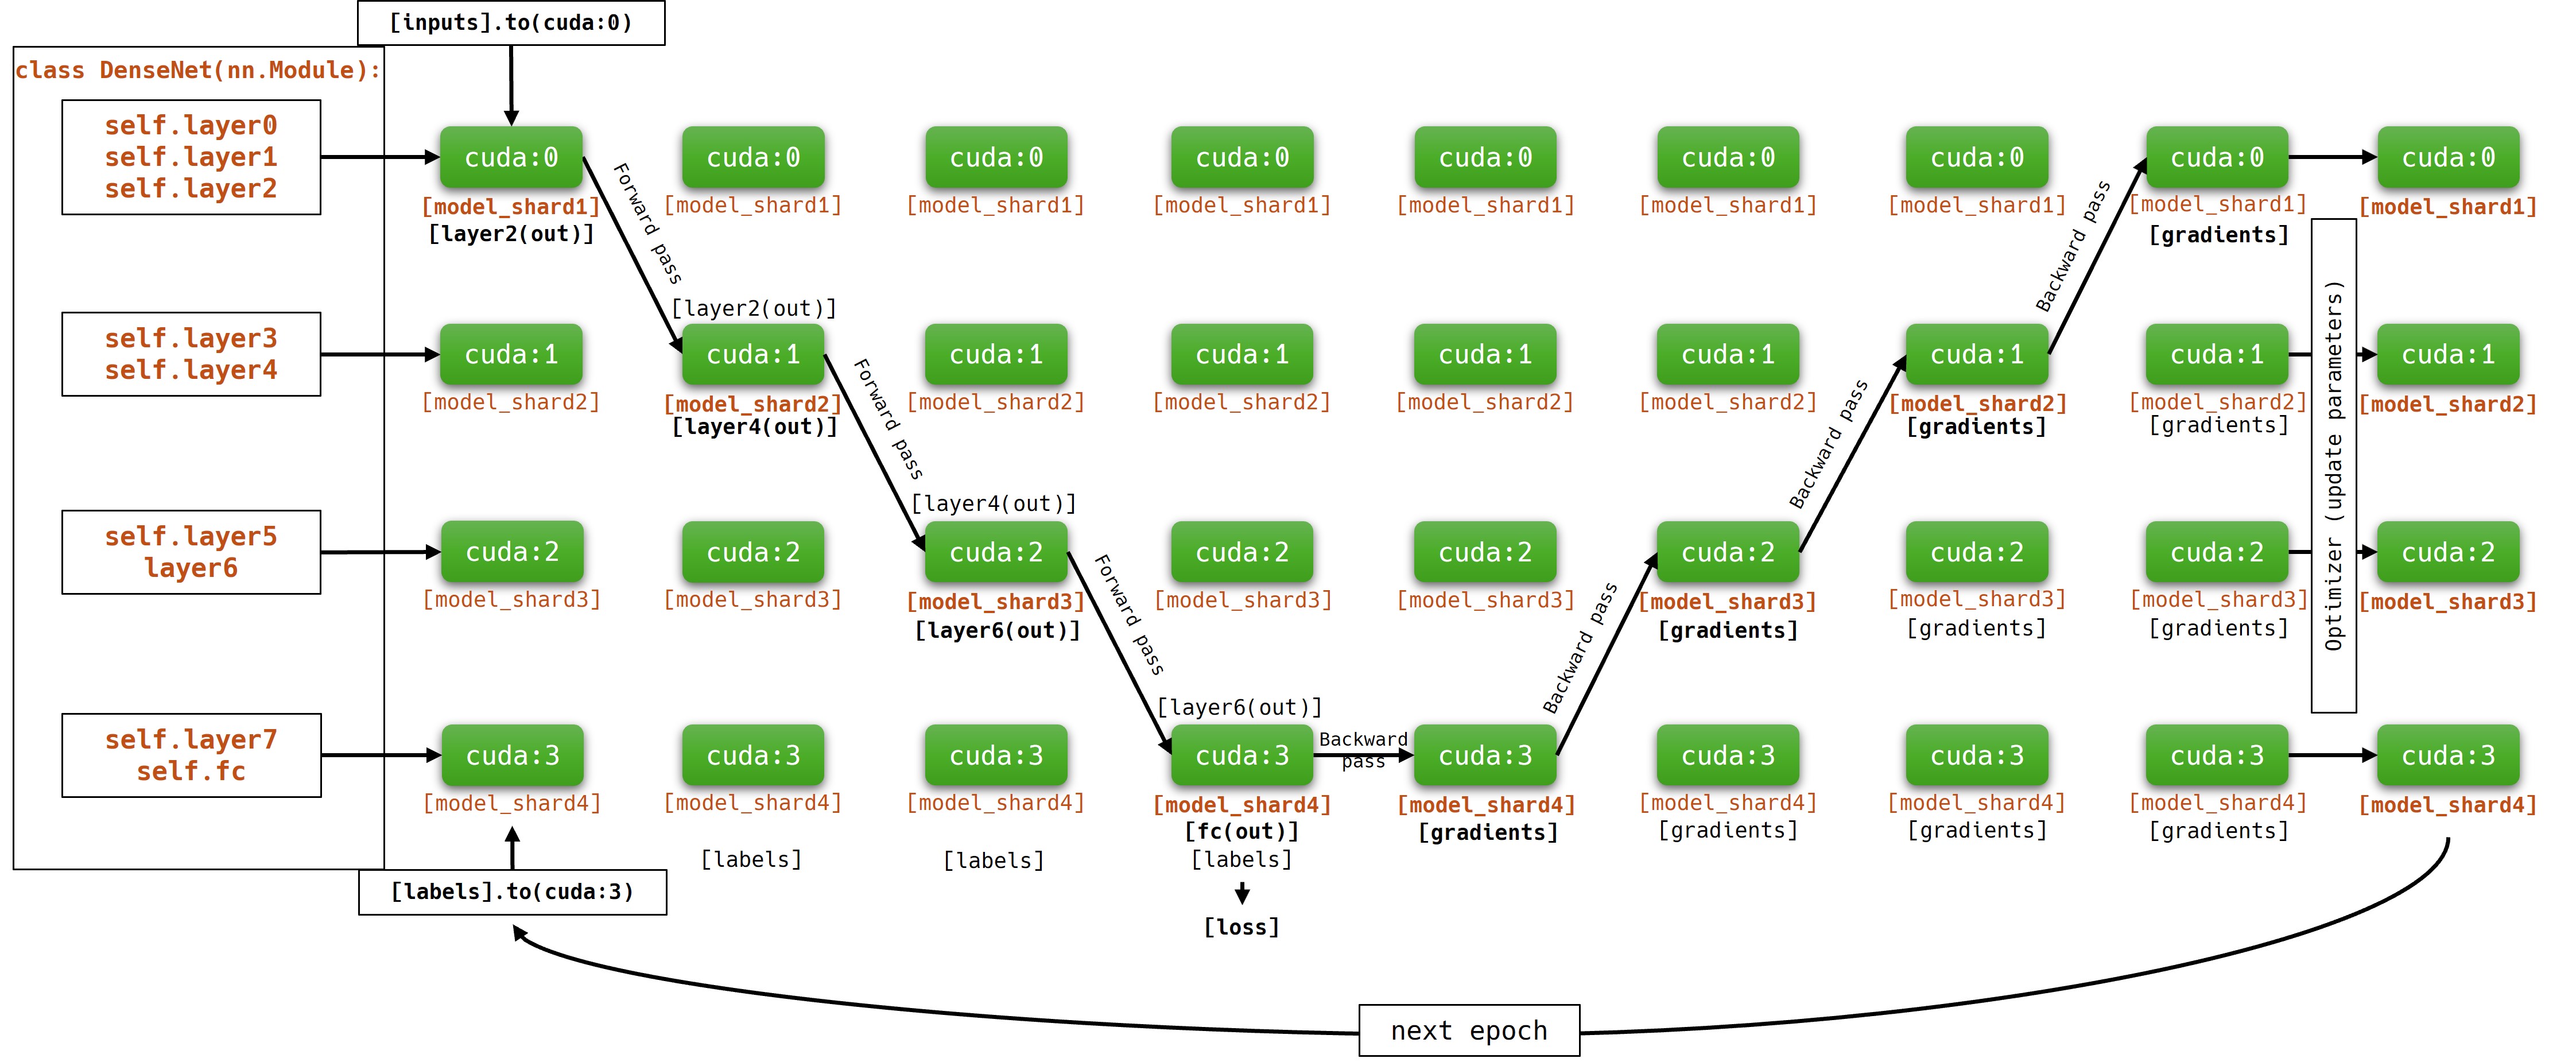
Model parallelism method is used when model size exceeds the vRAM capacity of a single GPU. Model parallelism involves manually assigning different layers of the model to different GPUs and managing data transfer between these GPUs during forward and backward passes. IMPORTANT: during training, GPUs containing currently inactive parts of the model are idle. Because of this, model parallelism can be inefficient! To submit a model parallel job with SLURM scheduler, use the script bellow:
#!/bin/bash #SBATCH --account=<account>
#SBATCH --partition=gpu
#SBATCH --nodes=1
#SBATCH --cpus-per-task=64
#SBATCH --time=0-00:15:00
#SBATCH --gres=gpu:4
#SBATCH --output=model_parallel_4GPU.out
#SBATCH --exclusive

module load pytorch

torchrun your_MP_job.py --epochs=100
(Torchrun is not necessarily required to run model parallelism.)
A complete example of a model parallelism job: https://git.einfra.hu/hpc-public/AI_examples.git
runscript: run_MP_n1_g4.sh
pytorch script: MP_n1_g4.py
DDP + Model Parallelism
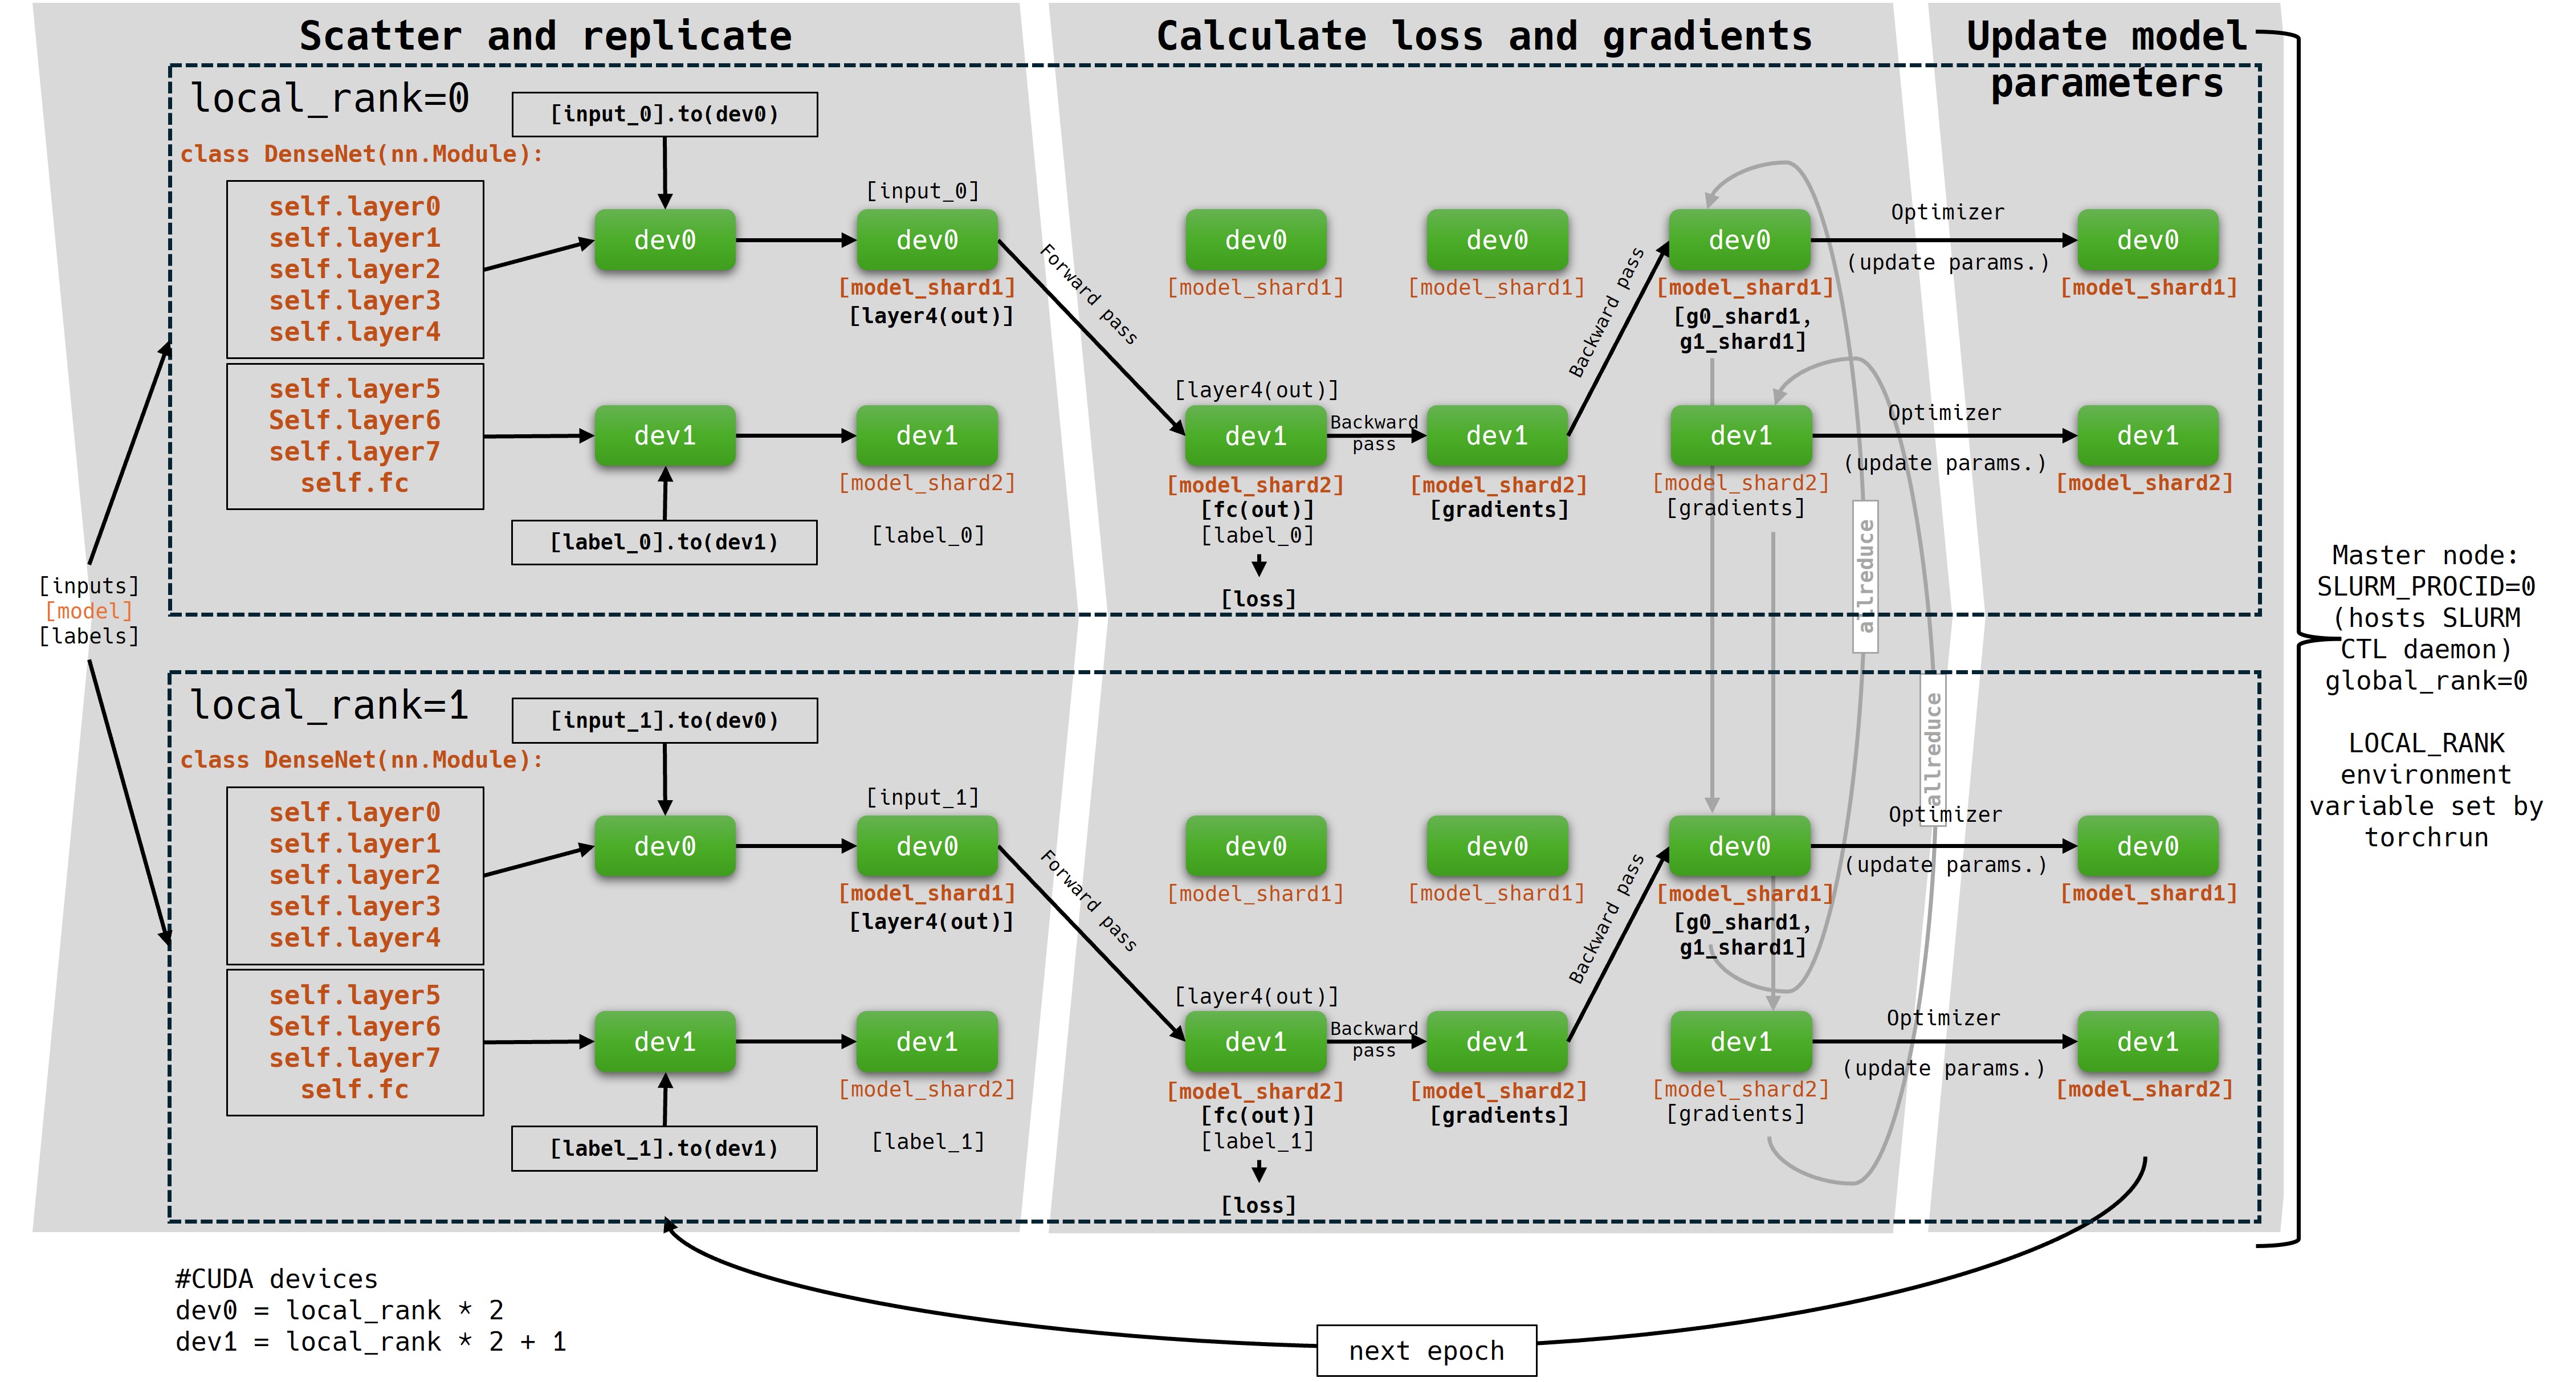
DDP can be combined with model parallelism. In this simplified flowchart, the model is distributed on 2 GPUs. This way, each node can hold 2 workers (groups). Local ranking on the node is handled by torchrun, device ordinals are dynamically set among workers. This hybrid method can be used when both the model size and the dataset is too large for a single GPU. Keep in mind: GPUs holding currently inactive parts of the modell will be idle.
Compared to the previous simple DDP jobscript, in this hybrid method, the process number is reduced to 2, since each node can only hold 2 workers.
#!/bin/bash
#SBATCH --account=<account>
#SBATCH --partition=gpu
#SBATCH --nodes=2
#SBATCH --ntasks-per-node=1
#SBATCH --cpus-per-task=64
#SBATCH --time=0-00:15:00
#SBATCH --gres=gpu:4
#SBATCH --output=output.out
#SBATCH --exclusive

export RDZV_HOST=$(hostname)
export RDZV_PORT=29400

srun torchrun \
    --nnodes=$SLURM_JOB_NUM_NODES \
    --nproc_per_node=2 \                        # worker number will change here
    --rdzv_id=$SLURM_JOB_ID \
    --rdzv_backend=c10d \
    --rdzv_endpoint="$RDZV_HOST:$RDZV_PORT" \
    your_DDP_MP_job.py
A complete example of a model parallelism job: https://git.einfra.hu/hpc-public/AI_examples.git
runscript: run_DDP_MP.sh
pytorch script: DDP_MP.py
Solutions for suboptimal GPU usage
GPU performance can be suboptimal, when you train a small model on a lot of small files. The reason for this, is that disk reading performance is lagging behind GPU performance. To increase GPU performance, wrap your data into Hierarchical Data Format (HDF5).
Download and convert the MNIST dataset to HDF5.
train_dataset = MNIST(root='data', train=True, transform=transforms.ToTensor(), download=True)

with h5py.File('mnist_train.hdf5', 'w') as hdf:
    # Create datasets inside the HDF5 file
    images_dataset = hdf.create_dataset('images', (len(train_dataset), 28, 28), dtype='float32')
    labels_dataset = hdf.create_dataset('labels', (len(train_dataset),), dtype='int64')


    for i, (image, label) in enumerate(train_dataset):
        images_dataset[i] = image.squeeze().numpy()  # Save the image
        labels_dataset[i] = label  # Save the label
Create a Pytorch-compatible dataset from the HDF5 file:
class H5Dataset(data.Dataset):
    def __init__(self, hdf5_file='mnist_train.hdf5', transform=None, preload=False):
        # Open the HDF5 file
        self.hdf5_file = hdf5_file
        self.transform = transform
        self.preload = preload

        self.hdf = h5py.File(self.hdf5_file, 'r', swmr=True)
        self.images = self.hdf['images']
        self.labels = self.hdf['labels']
        self.dataset_size = self.images.shape[0]

        if self.preload:
            self.images = self.images[:]
            self.labels = self.labels[:]


    def __len__(self):
        return self.dataset_size

    def __getitem__(self, index):
        # Open the file in read mode, fetch the image and label
        image = self.images[index]
        label = self.labels[index]

        if self.transform:
            image = self.transform(image)

        return image, label

    def __del__(self):
        # Ensure the HDF5 file is properly closed
        if hasattr(self, 'hdf') and self.hdf:
            self.hdf.close()
Load the dataset and train the model:
train_dataset = H5Dataset(hdf5_file, transform=transforms.ToTensor(), preload=False)
train_sampler = DistributedSampler(train_dataset)
train_loader = DataLoader(dataset=train_dataset, batch_size=batch_size,
                          shuffle=False, num_workers=0, pin_memory=True,
                          sampler=train_sampler)
The complete example code, with HDF5 and DDP: https://git.einfra.hu/hpc-public/AI_examples.git
Please note, the implementation allows to load the full dataset into memory. In this way, memory can be a limiting factor, but if your dataset is small, you can achieve further GPU performance boost.
The official H5py documentation: https://docs.h5py.org/en/stable/
The official Pytorch documentation is available here: https://pytorch.org/docs/stable/index.html
AI_env module package list
AI_env module package list:
Package Version
---------------------------------------- --------------
absl-py 2.2.2
accelerate 1.6.0
aiofiles 23.2.1
aiohappyeyeballs 2.6.1
aiohttp 3.11.18
aiosignal 1.3.2
altair 5.5.0
amqp 5.3.1
annotated-types 0.7.0
anyio 4.9.0
array_record 0.7.2
asgiref 3.8.1
asttokens 3.0.0
async-timeout 5.0.1
attrs 25.3.0
backoff 2.2.1
bcrypt 4.3.0
billiard 4.2.1
blis 1.3.0
build 1.2.2.post1
cachetools 5.5.2
catalogue 2.0.10
celery 5.5.2
certifi 2025.4.26
charset-normalizer 3.4.2
chex 0.1.89
chroma-hnswlib 0.7.6
chromadb 1.0.9
click 8.2.0
click-didyoumean 0.3.1
click-plugins 1.1.1
click-repl 0.3.0
cloudpathlib 0.21.0
cloudpickle 3.1.1
coloredlogs 15.0.1
confection 0.1.5
contourpy 1.3.2
cupy-cuda12x 13.4.1
cycler 0.12.1
cymem 2.0.11
dataclasses-json 0.6.7
datasets 3.6.0
decorator 5.2.1
deepspeed 0.16.7
Deprecated 1.2.18
diffusers 0.33.1
dill 0.3.8
distro 1.9.0
dm-tree 0.1.9
docker-pycreds 0.4.0
docstring_parser 0.16
durationpy 0.9
einops 0.8.1
etils 1.12.2
evaluate 0.4.3
exceptiongroup 1.3.0
executing 2.2.0
fastapi 0.115.9
fastjsonschema 2.21.1
fastrlock 0.8.3
ffmpy 0.5.0
filelock 3.13.1
flash_attn 2.7.4.post1
flatbuffers 25.2.10
flax 0.10.5
flower 2.0.1
fonttools 4.58.0
frozenlist 1.6.0
fsspec 2024.6.1
gitdb 4.0.12
GitPython 3.1.44
google-auth 2.40.1
google-auth-oauthlib 1.2.2
google-pasta 0.2.0
googleapis-common-protos 1.70.0
gradio 3.50.0
gradio_client 0.6.1
groovy 0.1.2
grpcio 1.71.0
gym 0.26.2
gym-notices 0.0.8
h11 0.16.0
h5py 3.13.0
hf-xet 1.1.1
hjson 3.1.0
httpcore 1.0.9
httptools 0.6.4
httpx 0.28.1
huggingface-hub 0.31.1
humanfriendly 10.0
humanize 4.12.3
idna 3.10
imageio 2.37.0
immutabledict 4.2.1
importlib_metadata 8.6.1
importlib_resources 6.5.2
iniconfig 2.1.0
inquirerpy 0.3.4
ipython 8.36.0
jax 0.5.3
jax-ai-stack 2025.4.9
jax-cuda12-pjrt 0.6.0
jax-cuda12-plugin 0.6.0
jaxlib 0.5.3
jaxtyping 0.3.2
jedi 0.19.2
Jinja2 3.1.3
joblib 1.5.0
json5 0.12.0
jsonpointer 3.0.0
jsonschema 4.23.0
jsonschema-specifications 2025.4.1
Keras-Preprocessing 1.1.2
kiwisolver 1.4.8
kombu 5.5.3
kubernetes 32.0.1
langcodes 3.5.0
language_data 1.3.0
lazy_loader 0.4
lightning 2.5.1.post0
lightning-utilities 0.14.3
marisa-trie 1.2.1
Markdown 3.8
markdown-it-py 3.0.0
MarkupSafe 2.1.5
marshmallow 3.26.1
matplotlib 3.10.3
matplotlib-inline 0.1.7
mdurl 0.1.2
ml_dtypes 0.5.1
mmh3 5.1.0
mpmath 1.3.0
msgpack 1.1.0
multidict 6.4.3
multiprocess 0.70.16
mup 1.0.0
murmurhash 1.0.12
mypy_extensions 1.1.0
narwhals 1.39.0
nest-asyncio 1.6.0
networkx 3.3
ninja 1.11.1.4
numpy 1.26.4
nvidia-cublas-cu12 12.4.5.8
nvidia-cuda-cupti-cu12 12.4.127
nvidia-cuda-nvcc-cu12 12.9.41
nvidia-cuda-nvrtc-cu12 12.4.127
nvidia-cuda-runtime-cu12 12.4.127
nvidia-cudnn-cu12 9.1.0.70
nvidia-cufft-cu12 11.2.1.3
nvidia-curand-cu12 10.3.5.147
nvidia-cusolver-cu12 11.6.1.9
nvidia-cusparse-cu12 12.3.1.170
nvidia-ml-py 12.575.51
nvidia-nccl-cu12 2.21.5
nvidia-nvjitlink-cu12 12.4.127
nvidia-nvtx-cu12 12.4.127
oauthlib 3.2.2
onnxruntime 1.22.0
opencv-python 4.11.0.86
opentelemetry-api 1.33.0
opentelemetry-exporter-otlp-proto-common 1.33.0
opentelemetry-exporter-otlp-proto-grpc 1.33.0
opentelemetry-instrumentation 0.54b0
opentelemetry-instrumentation-asgi 0.54b0
opentelemetry-instrumentation-fastapi 0.54b0
opentelemetry-proto 1.33.0
opentelemetry-sdk 1.33.0
opentelemetry-semantic-conventions 0.54b0
opentelemetry-util-http 0.54b0
opt_einsum 3.4.0
optax 0.2.4
orbax-checkpoint 0.11.12
orbax-export 0.0.6
orjson 3.10.18
overrides 7.7.0
packaging 24.2
pandas 2.2.3
pandocfilters 1.5.1
parso 0.8.4
peft 0.15.2
pexpect 4.9.0
pfzy 0.3.4
pillow 10.4.0
pip 22.3.1
platformdirs 4.3.8
plotly 6.0.1
pluggy 1.5.0
posthog 4.0.1
preshed 3.0.9
prettytable 3.16.0
prometheus_client 0.21.1
promise 2.3
prompt_toolkit 3.0.51
propcache 0.3.1
protobuf 4.21.12
psutil 7.0.0
ptyprocess 0.7.0
pure_eval 0.2.3
py-cpuinfo 9.0.0
pyarrow 20.0.0
pyasn1 0.6.1
pyasn1_modules 0.4.2
pydantic 2.11.4
pydantic_core 2.33.2
pydub 0.25.1
pyg-library 0.2.0
Pygments 2.19.1
pynvml 12.0.0
pyparsing 3.2.3
PyPika 0.48.9
pyproject_hooks 1.2.0
pytest 8.3.5
python-dateutil 2.9.0.post0
python-dotenv 1.1.0
python-json-logger 3.3.0
python-multipart 0.0.20
pytorch-lightning 2.5.1.post0
pytorch-lightning-bolts 0.3.2.post1
pytz 2025.2
PyYAML 6.0.2
ray 2.46.0
referencing 0.36.2
regex 2024.11.6
requests 2.32.3
requests-oauthlib 2.0.0
rich 14.0.0
rpds-py 0.24.0
rsa 4.9.1
ruff 0.11.9
safehttpx 0.1.6
safetensors 0.5.3
scikit-image 0.25.2
scikit-learn 1.6.1
scipy 1.15.3
seaborn 0.13.2
semantic-version 2.10.0
sentence-transformers 4.1.0
sentencepiece 0.2.0
sentry-sdk 2.28.0
setproctitle 1.3.6
setuptools 65.5.0
shellingham 1.5.4
simple-parsing 0.1.7
simplejson 3.20.1
six 1.17.0
smart-open 7.1.0
smmap 5.0.2
sniffio 1.3.1
snowballstemmer 3.0.1
spacy 3.8.5
spacy-legacy 3.0.12
spacy-llm 0.7.3
spacy-loggers 1.0.5
srsly 2.5.1
stack-data 0.6.3
starlette 0.45.3
sympy 1.13.1
tenacity 9.1.2
tensorboard 2.19.0
tensorboard-data-server 0.7.2
tensorflow-datasets 4.9.8
tensorflow-metadata 1.17.1
tensorstore 0.1.74
termcolor 3.1.0
terminado 0.18.1
thinc 8.3.6
threadpoolctl 3.6.0
tifffile 2025.5.10
tiktoken 0.9.0
tokenizer 3.4.5
tokenizers 0.21.1
toml 0.10.2
tomli 2.2.1
tomlkit 0.13.2
toolz 1.0.0
torch 2.5.1+cu124
torch-cluster 1.6.3
torch-geometric 2.6.1
torch-scatter 2.1.2
torch-sparse 0.6.18
torch-tb-profiler 0.4.3
torchaudio 2.5.1+cu124
torchdata 0.11.0
torchfile 0.1.0
torchinfo 1.8.0
torchmetrics 1.7.1
torchvision 0.20.1+cu124
tornado 6.4.2
tqdm 4.67.1
traitlets 5.14.3
transformers 4.51.3
treescope 0.1.9
triton 3.1.0
typer 0.15.3
types-dataclasses 0.6.6
types-python-dateutil 2.9.0.20241206
typing_extensions 4.13.2
typing-inspect 0.9.0
typing-inspection 0.4.0
tzdata 2025.2
urllib3 2.4.0
uvicorn 0.34.2
uvloop 0.21.0
vine 5.1.0
wadler_lindig 0.1.5
wandb 0.19.11
wasabi 1.1.3
watchfiles 1.0.5
wcwidth 0.2.13
weasel 0.4.1
websocket-client 1.8.0
websockets 11.0.3
Werkzeug 3.1.3
wrapt 1.17.2
xgboost 3.0.0
xxhash 3.5.0
yarl 1.20.0
zipp 3.21.0